


Detailed Step-by-Step Tutorial Available for Purchase

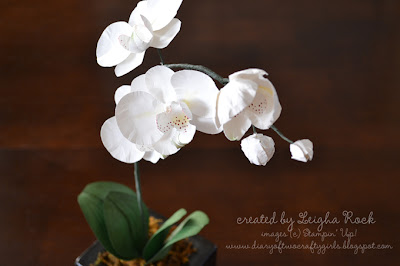
This stunning spray of orchids and the leaves are completely out of paper (and a little floral wire and tape).

Wouldn't you love to make this beautiful arrangement for someone special? Now you can! Due to an overwhelming demand from this post, I have put together a detailed tutorial on how make each of these stunning flowers and how to replicate the arrangement. The tutorial is in six parts. The tutorial includes the orchid template (designed by me) necessary to create the flowers and leaves. It also includes five detailed tutorials which give clear step-by-step instructions with tons of gorgeous photos on how to make the full blooms, the partially opened orchids, the buds, the leaves, and how to put it all together. The complete tutorial is 15 pages in length and has 32 photos. The flowers are not difficult to make, but a lot of photos are required to give complete step-by-step instruction. It also gives lots of instruction on how to create the subtle effects that really make the flowers look real and come to life.


The complete template and five part tutorial on how to make this project is available for purchase for only $5.95
UPDATE: (added June 1, 2012): You are purchasing a tutorial from 2011. Some of the items used in the tutorial have been discontinued from Stampin' Up! This tutorial is still easily re-created. Simple substitutions are noted here. As of June 1, 2012, Stampin' Pastels and the Mat Pack are no longer available for ordering through Stampin' Up! The Stampin' Pastels can easily be substituted for other pastels, or with the corresponding classic ink sponged on with a cotton tipped applicator. Any piece of thin foam can be substituted for the foam mat from the Mat Pack.
Or find the link to purchase on the top right sidebar. The tutorial will be e-mailed to the email address registered to your paypal account within 24 hours as six Adobe PDF (one template and 5 tutorials) files following your purchase. If you do not receive your email, please check your spam box. If you still have not received your file within 24 hours, please contact me so I can correct any issues.
Please note: these flowers are created with a template (which is included in the tutorial), not with punches* like my other paper flower tutorial. The great thing about this is, you do not need a tons of supplies to make these blooms, just some paper, a little ink, and some floral wire and tape. (* except the orchid bud which is formed with the Fun Flowers die)
Alternatively, place a minimum of $60 in Stampin' Up! products on my online store , and I will email you the PDF Tutorial free of charge!
Here is a testimonial from one of my customers:
"Leigha!!!!
Your tutorial is fantastic! I’m making Christmas gifts and can hardly wait to get started for two daughters, three daughters-in-laws, and one other gift. And one for myself. I have an orchid that blooms for about 3 months and then it’s done for a while…this will be great to add when it’s not blooming." -- Elaine

The blooms can be wired and made into an arrangment like above (these leaves are paper and are also included in the tutorial), or they could be worked into a beautiful paper flower bouquet. You can also make the blooms without wiring them, and use them for lots of different papercrafting projects.

or contact me to place an order (Canadian orders only please).
(NOTE: if you are ordering online, please check that you see my name listed at the top of the website as the demonstrator for your order. Sometimes it will default to a demonstrator you have used previously. You may need to clear your cookies before a new demonstrator's name will appear. This is important if you want to qualify for the free tutorial).
or click here to email me your order
Feel free to contact me if you have any questions.


1 comments:
super gorgeous leigha.. ; )
Post a Comment